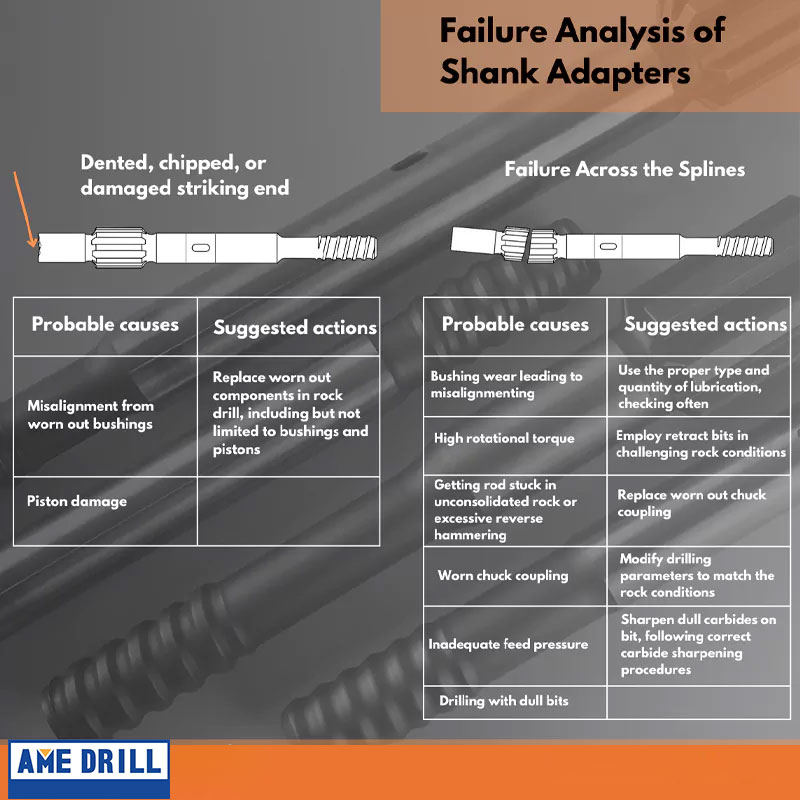
1. Dented, chipped, or damaged striking end
Probable causes:
– Misalignment from worn-out bushings
– Piston damage
Suggested actions:
– Replace worn-out components in the rock drill, including but not limited to bushings and pistons
2. Failure Across the Splines
Probable causes:
– Bushing wear leading to misalignment
– High rotational torque
– Getting the rod stuck in unconsolidated rock or excessive reverse hammering
– Worn chuck coupling
– Inadequate feed pressure
– Drilling with dull bits
Suggested actions:
– Use the proper type and quantity of lubrication, checking often
– Employ retract bits in challenging rock conditions
– Replace worn-out chuck coupling
– Modify drilling parameters to match the rock conditions
– Sharpen dull carbides on bit, following correct carbide sharpening procedures
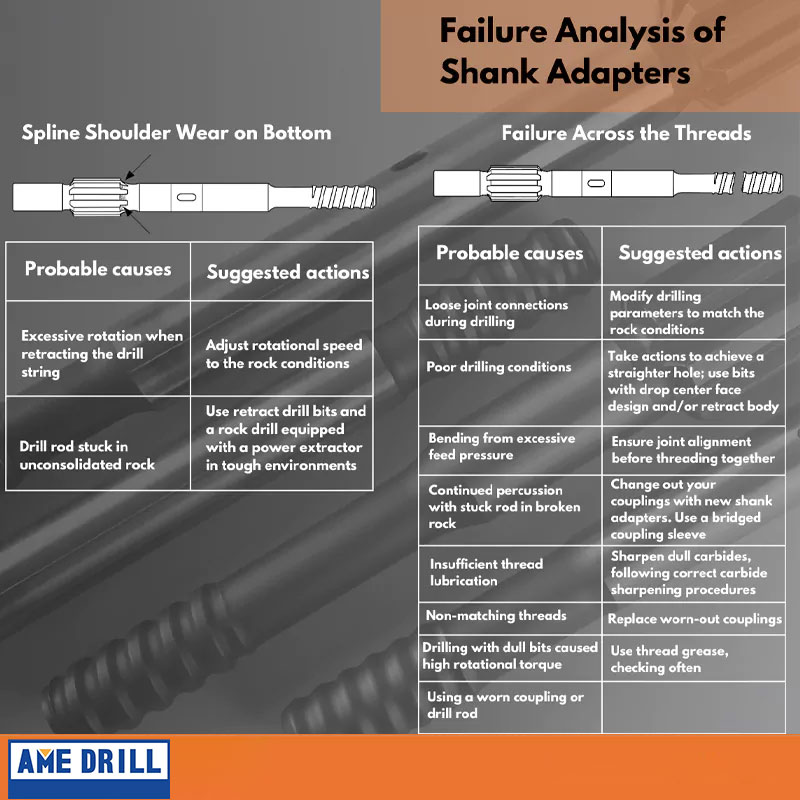
3. Spline shoulder wear on the bottom
Probable causes:
– Excessive rotation when retracting the drill string
– Drill rod stuck in unconsolidated rock
Suggested actions:
– Adjust rotational speed to the rock conditions
– Use retract drill bits and a rock drill equipped with a power extractor in tough environments
4. Failure Across the Threads
Probable causes:
– Loose joint connections during drilling
– Poor drilling conditions
– Bending from excessive feed pressure
– Continued percussion with a stuck rod in broken rock
– Insufficient thread lubrication
– Non-matching threads
– Drilling with dull bits caused high rotational torque
– Using a worn coupling or drill rod
– Hole deviation
Suggested actions:
– Modify drilling parameters to match the rock conditions
– Take actions to achieve a straighter hole; use bits with drop center face design and/or retract body
– Ensure joint alignment before threading together
– Change out your couplings with new shank adapters. Use a bridged coupling sleeve
– Sharpen dull carbides, following correct carbide sharpening procedures
– Use thread grease, checking often
– Replace worn-out couplings.
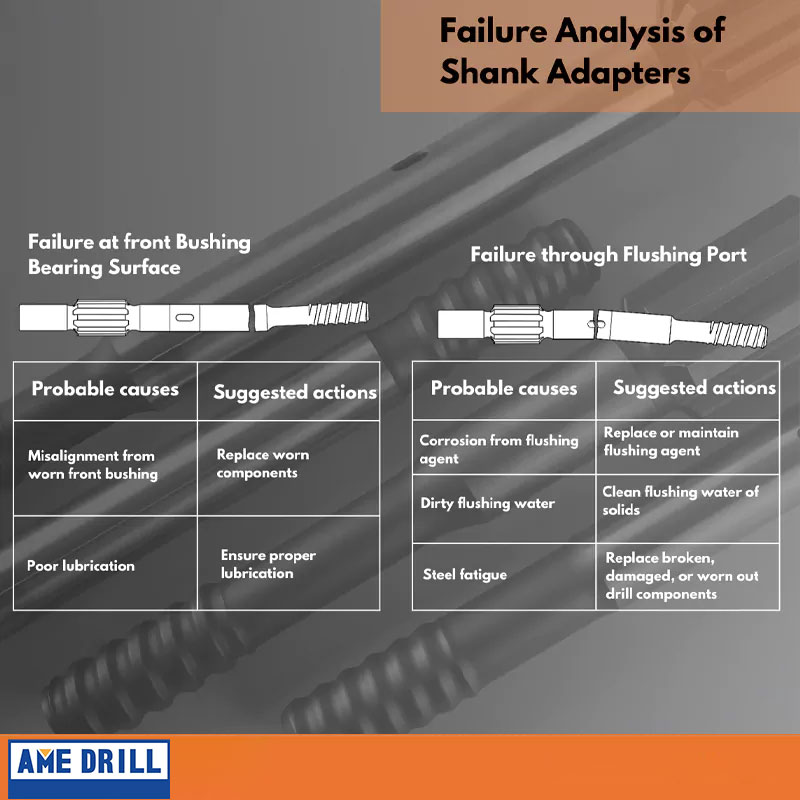
5. Failure at Front Bushing Bearing Surface
Probable causes:
– Misalignment from a worn front bushing
– Poor lubrication
Suggested actions:
– Replace worn components
– Ensure proper lubrication
6. Failure through Flushing Port
Probable causes:
– Corrosion from flushing agent
– Dirty flushing water
– Steel fatigue
Suggested actions:
– Replace or maintain flushing agent
– Clean flushing water of solids
– Replace broken, damaged, or worn-out drill components
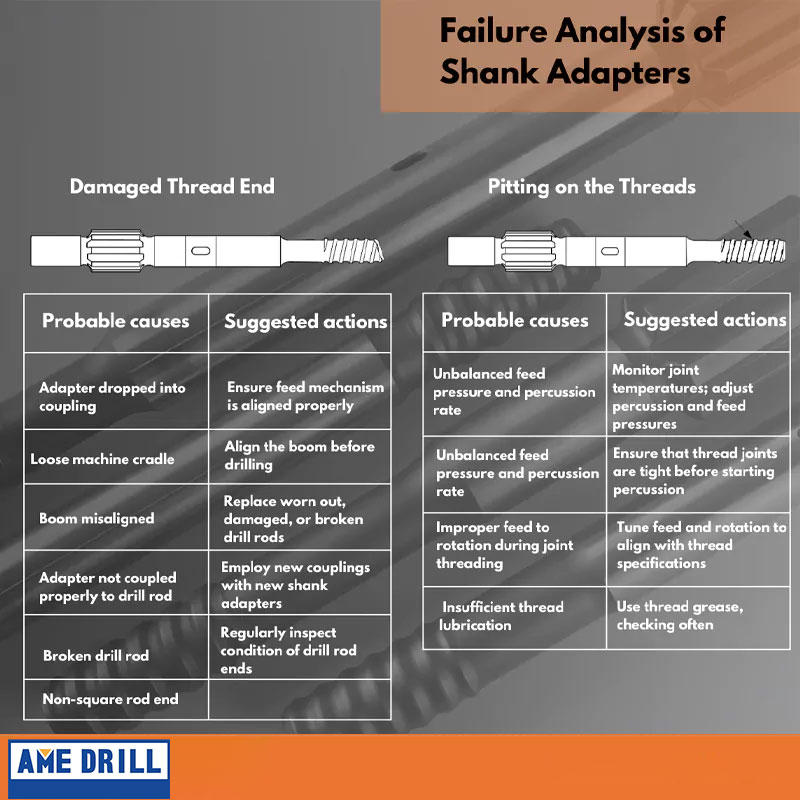
7. Damaged Thread End
Probable causes:
– Adapter dropped into the coupling
– Loose machine cradle
– Boom misaligned
– Adapter not coupled properly to the drill rod
– Broken drill rod
– Non-square rod end
Suggested actions:
– Ensure the feed mechanism is aligned properly
– Align the boom before drilling
– Replace worn-out, damaged, or broken drill rods
– Employ new couplings with new shank adapters
– Regularly inspect the condition of drill rod ends
8. Pitting on the threads
Probable causes:
– Unbalanced feed pressure and percussion rate
– Drilling with loose thread joints
– Improper feed to the rotation during joint threading
– Insufficient thread lubrication
Suggested actions:
– Monitor joint temperatures; adjust percussion and feed pressures
– Ensure that thread joints are tight before starting percussion.
– Tune feed and rotation to align with thread specifications
– Use thread grease, checking often